Glassware is not the most exciting part of the beer consumption experience, for most people ranking somewhere right below the importance of checking the “Best By” date on your bottles. And for many beer drinkers—including myself on many occasions in the past, and all occasions before I “got in to” craft beer—the “appropriate glass” is whatever is clean(-ish) and close. Indeed, for many, the glass is a formality to be skipped entirely. Why dirty another dish that you’ll just have to clean later when your beer came packaged in a perfectly serviceable consumption vessel? Well, pay attention – we already covered why. So if you’re convinced that the appearance, aroma, flavors, and mouthfeel of your beer will suffer (unnecessarily) if you fail to properly serve your beer, then congratulations – you’re ready to take the next step, the “how” and the “what” of glassware.
The “how” is pretty straightforward, and our advice here takes the form of two oft-ignored tips and a how-to. The first pro-tip we touched upon in a previous post about serving temperature; it stands to reason if the beverage itself shouldn’t be chilled to the point of nearly becoming a beer slushee, the glass likewise should be at room temperature or perhaps very lightly chilled. Something we haven’t touched upon, however, is the importance of avoiding the use of harsh dishwashing soaps or detergents on your glassware. Obviously, it’s important that your glassware be clean before being given the opportunity to cradle your perfectly cooled brew and carry it heavenward to your eagerly awaiting lips – oils and other hydrophobic compounds can persist in glassware and can absolutely kill head retention, which defeats much of the purpose of using glassware to begin with. By the same token, however, using a dishwashing soap that’s too aggressive can have the same effect, leaving behind residue that can impact the ability of a head to nucleate, form, and persist through your drinking experience. It’s also best to let your glasses air dry – those dish towels we all have laying around our kitchens can leave dust particles on the inside of your glass, which—you guessed it—can impact head formation and retention. This gentle treatment will also have the benefit of improving the lifespan of your glasses – many breweries and glassware wholesalers offer glasses that are rimmed in soft metals or have silk-screened brewery logos on them, and a lot of wiping or strong soaps can dull or strip these aesthetically pleasing flourishes. In short, hand wash with a mild soap and let the glasses air dry. Simple, yes?

At the risk of sounding like a pedant (who am I kidding, but these are supposed to be educational blog posts, right?), most people could stand to improve their pouring technique. I can’t tell you the number of bars I’ve been to where the bartender – the professional, right? – serves me a beer with a massive, foamy, three-inch head, or no head and beer right up to the lip of the glass. I’ll chalk it up to their job being fast paced and requiring them to operate in a stressful environment, so that means there’s no excuse why you, the casual drinker at home with an expensive, finely crafted bottle of beer in your refrigerator, shouldn’t be able to execute the perfect pour. Every. Time. It’s not rocket science either:
1) Hold your glass at a 45 degree angle;
2) Begin to pour the beer, keeping the mouth of the bottle nearly touching the point halfway between the base and mouth of the glass. The point is to pour as gently as possible here – you’re simply transferring bulk liquid from the bottle to your serving vessel here.
3) At some point (n.b.), raise your glass from a 45 degree angle to a 90 degree angle, readjust the bottle commensurately, and continue to pour. This pour will obviously be much more aggressive, with gravity causing the remaining beer in your bottle to cascade rapidly and forcefully in to the bulk of liquid now in your glass. This will result in the liberation of carbon dioxide, nucleation, and—voila!— the creation of the perfect head, about 2cm tall.
Now, note I said “at some point” above. This is the tricky part, and the part that requires some experience. Beer is bottled under pressure, that pressure either being created by the activity of yeast in the bottle, fermenting sugars and creating carbon dioxide as a byproduct or (less naturally, but often more practical in a brewery setting) by putting the beer in a vessel which then has carbon dioxide pumped in to it. This vessel is usually referred to as a “bright tank,” because this is where the beer “brightens,” as CO2 goes in to solution (among other things). The point is this: different beers have different amounts of dissolved CO2. Some styles are supposed to be bright, crisp, and effervescent, like Belgian golden ales and German wheat beers. Others are supposed to be much less carbonated, still, with only enough dissolved carbonation to keep the beer from being flat or cloying, like barleywines. Even amongst the same style, beers can contain wildly different amounts of carbonation.
It’s this knowledge that will instruct how quickly you raise your glass to a 90 degree angle and begin the “aggressive” part of your pour. If you’re pouring a highly carbonated style, you might not do it until the last moment, as the very gentle action in step 2 will already be “liberating” a bunch of carbon dioxide from a solution that is oversaturated with it. You might even have to pour the beer in two distinct steps, waiting for the head created by the first half of your pour to fall because so much carbon dioxide is coming out of solution there’s no way to fit all of the beer in the glass. Alternatively, if your beer falls in to the opposite category, you might need to nearly start with a vertical pour, and even increase the distance between the bottle and glass (i.e., raise the glass up really high) to make the entry of the beer in to the glass as violent as possible, lest you get nearly no head or no head at all.
Also, here’s a video of a robot doing it better than I will ever be able to do it (though using a different method of than the one described above).
Coming soon to a bar near you!
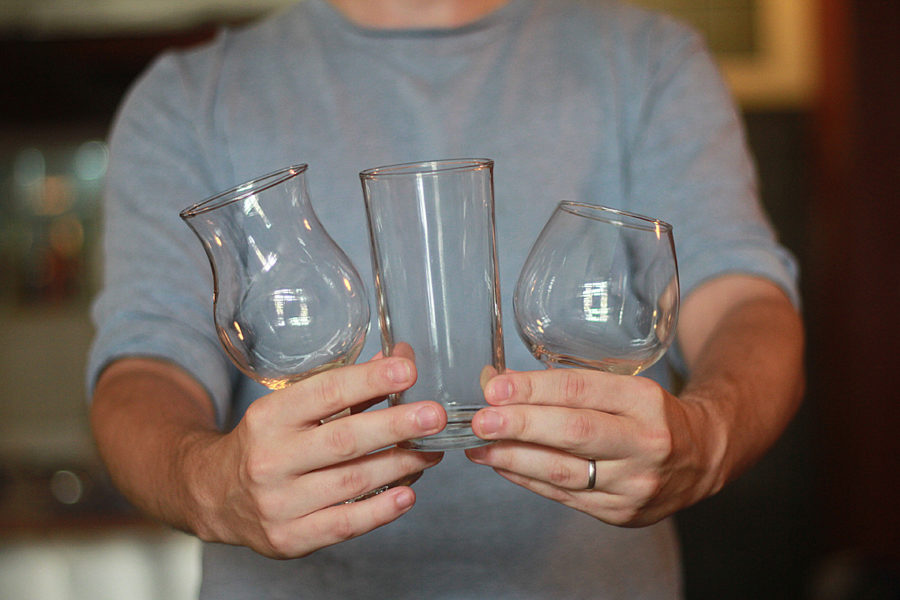
Ok, so we’ve covered the “how” – what about the “what?” That is, what type of glass should you be not chilling, cleaning, and pouring your precious beer in to? There are hundreds – literally, hundreds – of styles of glassware, and it’s easy to get lost in all the little nuances and colorful logos and miss sight of the elements of a glass that are important. What we’re really trying to do is have a portfolio of glasses that showcase the appearance and protect and present the aroma, flavors, and mouthfeel of the vast majority of styles of beer you’re going to drink. After years of buying glasses and not using most of them frequently enough to have justified purchasing them in the first place, I’m of the opinion that this can be accomplished with three—yes, only three—different pieces of glassware.
First, let me absolutely clear – the pint glass is NOT one of these pieces of glassware. The shaker pint is the most ubiquitous beer serving vessel in the world, and that has nothing to do with its ability to meet the criteria we’ve relayed above. It’s popular because it’s cheap to make, hard to break, easy to clean, and easy to stack and store – i.e., it helps to protect the bottom line of bar owners and restauranteers. Every brewery offers their own logoed shaker pint glass for purchase, and many people purchase these thinking they’re doing themselves and their beer a favor by using them. Looking at its shape, however, should make it painfully obvious that the pint glass does nothing to promote head formation or retention (its tapered sides would actually seem to do the opposite, if anything), collect aromas, or really showcase what you’re pouring in to it. If you’re looking for a souvenir of your trip to Brewery X, sure, pick yourself up a pint glass – but don’t fool yourself in to thinking you’re being a connoisseur of craft by pouring their Double Imperial Bourbon Barrel Stout in to it. Note: the Cebruery will NOT be offering logoed pint glasses.
So what (clean, room temperature) three glasses can you get away with that accomplish the goals covered in our previous post without breaking the bank?
1) The tulip/balloon tulip:
A tulip glass is any glass that consists of a bowl-shaped body that narrows as it ascends before flaring out and widening again at the rim. This is my go to glass for any and all beers Belgian (think dubbels, tripels, and Belgian dark and golden beers, as well as saisons), most American- and British-style ales (from pale ales to porters and everything in between), and anything that’s primarily hop-focused or with a lot of yeast esters and aromatics but also with a head (IPAs, anyone?). The shape of the tulip promotes the formation and retention of a good two-to-four centimeters of head, and regulations and enhances the expression of all of those great volatile hop oils and yeast esters. It also looks really neat. This glass would be perfect for our People Power Pale Ale, Chocolate Hills Porter, Dumaguete Dubbel, and our Humulus Lapu-Lapulus series beers, as well as some of our effervescent and lower-abv% limited releases like our Golden Lady Tripel and our Witchy Woman Pumpkin Ale.
2) The weizen:
A weizen glass is a tall glass that gently bows out from the base and curves upwards in to a bowl before narrowing again at the rim. The purpose of this “bowl” is to collect the massive amount of foamy head that’s formed by a lot of highly carbonated styles, like German hefeweizens. Even though they were designed for this style of beer, I find that the long, narrow glass works very well for American lagers, pilsners, and other styles that often form a larger-than-average head, have lots of expressive carbonation, and that have a crisp, clean, pale color that you want to showcase in a tall glass that lets in a lot of light. A weizen glass would be perfect for our Gold Dust Woman Hefeweizen, our Evil Woman Weizenbock, as well as our Boracay Blonde and our Sour Girl Berlinerweiss.

3) The snifter:
Not just for brandy anymore. The snifter performs the same aromatic functions as the tulip glass without encouraging head formation. It usually also has less space between the bowl and your hand, so the beer you’re drinking will tend to warm up faster. The snifter is perfect for higher abv% beers (which tend not to have large heads anyway, as ethanol discourages head formation) and darker, maltier beers that rely more on flavor compounds than aromatic compounds and should be served warmer. Think imperial stouts, barleywines and wheatwines, non-effervescence wild ales and sours, baltic porters. Plus, larger snifters (20 fl oz. or so) with enough clearance enable you to swirl the beer around, giving you control over the rate of the release of volatile aromatic compounds and making you look super erudite. The snifter would make a great home for a lot of our higher-abv% and maltier limited release beers, including all our Kahoy series beers and our Black Magic Woman Imperial Stout and American Woman Barleywine.
There are a ton of glasses out there – footed pilsners, cervoises, witbier tumblers, nonics, goblets, chalices, steins, mugs, stanges, flutes, glasses shaped like cartoon heads and boots and animal horns. And they all have their appropriate place and time. However, these three are going to cover 95% of your needs with 95% of the styles and beers you’re going to be coming in to contact with, and that means less money spent on glassware and more spent on what goes in the glassware. And THAT’s the exciting part.
For questions about this blog post, brewing and beer inquiries, or just to say hi, you can email me at:
![]() The Brewmaster: brewmaster@thecebruery.com
The Brewmaster: brewmaster@thecebruery.com


